info
“Ephemeral environments” refers to the ability to create short-lived copies of your system so that:
- Developers can work in their isolated environments and make changes without affecting others.
- Test data does not pollute shared environments such as dev and staging.
- Once a feature is complete, the ephemeral environment can be safely torn down.
It’s a powerful practice and works great with services that charge on a pay-per-use basis. There is no extra charge for these environments – it’s only the activities that count.
However, services that charge by uptime (aka “serverful”), such as Amazon RDS, present a logistical problem – your uptime cost increases with the number of environments.
To mitigate the extra uptime cost, you can share the same RDS cluster across multiple environments. But this adds friction to the development workflow and complicates deployment:
- The RDS cluster must be deployed separately, so you can no longer review and update the whole system as a single unit.
- You need scripts to create and delete environment-specific databases or schemas.
Fortunately, Neon Serverless Postgres solves these problems.
In this article, we will explore how Neon works, and I will provide a step-by-step guide for using Neon with ephemeral environments.
What is Neon?
Neon is a serverless database platform built around PostgreSQL.
It separates storage and compute, and you pay only for the processing power you use. On paper, it’s similar to Aurora Serverless v2 in many ways, but there are some notable differences.
Scaling & Cold Starts
Both can scale to zero during inactivity. But Neon scales much faster than Aurora Serverless v2, which takes a slower and more conservative approach.
Neon also cold starts from zero in 500ms vs. 15s for Aurora Serverless v2. This is important for development and ephemeral environments, where there are often long gaps between bursts of database activities.
Connection Pooling & Data API
Neon integrates PgBouncer directly into its architecture, enabling it to handle up to 10,000 concurrent connections and queue requests during spikes, rather than rejecting them.
Aurora Serverless v2 calculates the max connections based on ACU. Serverless applications often create many short-lived connections as Lambda execution environments are created and destroyed. This can cause connection pool exhaustion, which is why many serverless applications would use RDS Proxy to scale the number of concurrent connections or switch to Aurora Serverless v2’s Data API.
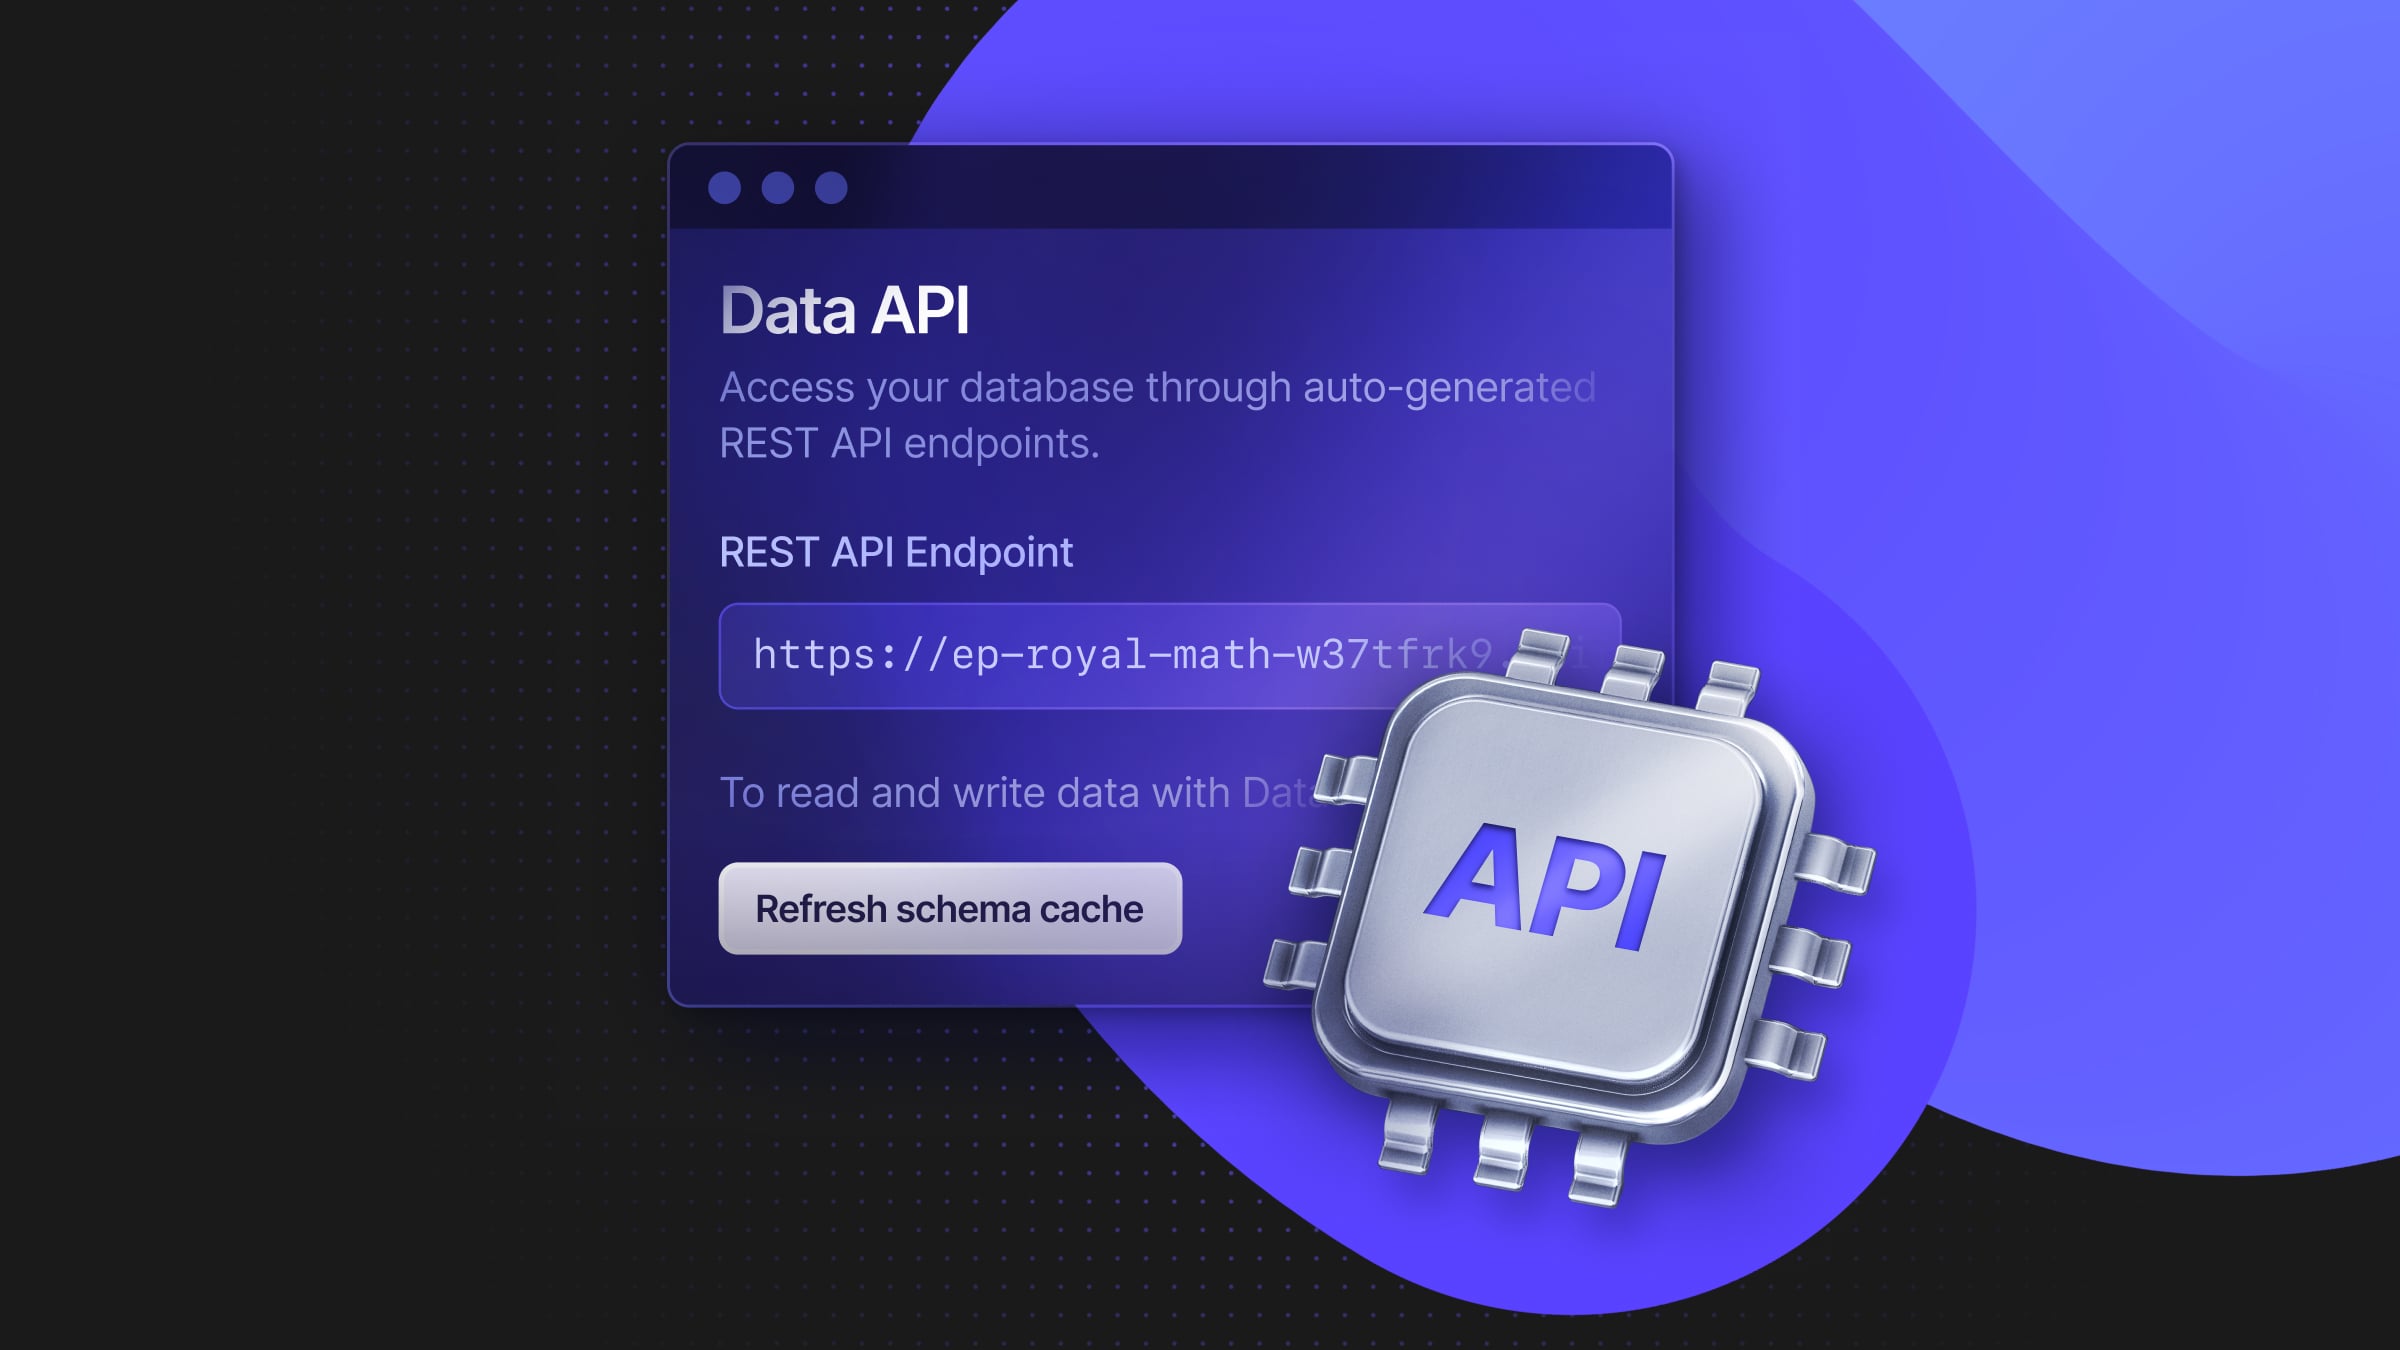
Neon also has a data API that allows you to execute queries over HTTP or WebSockets. You can use the data API via Neon’s serverless driver.
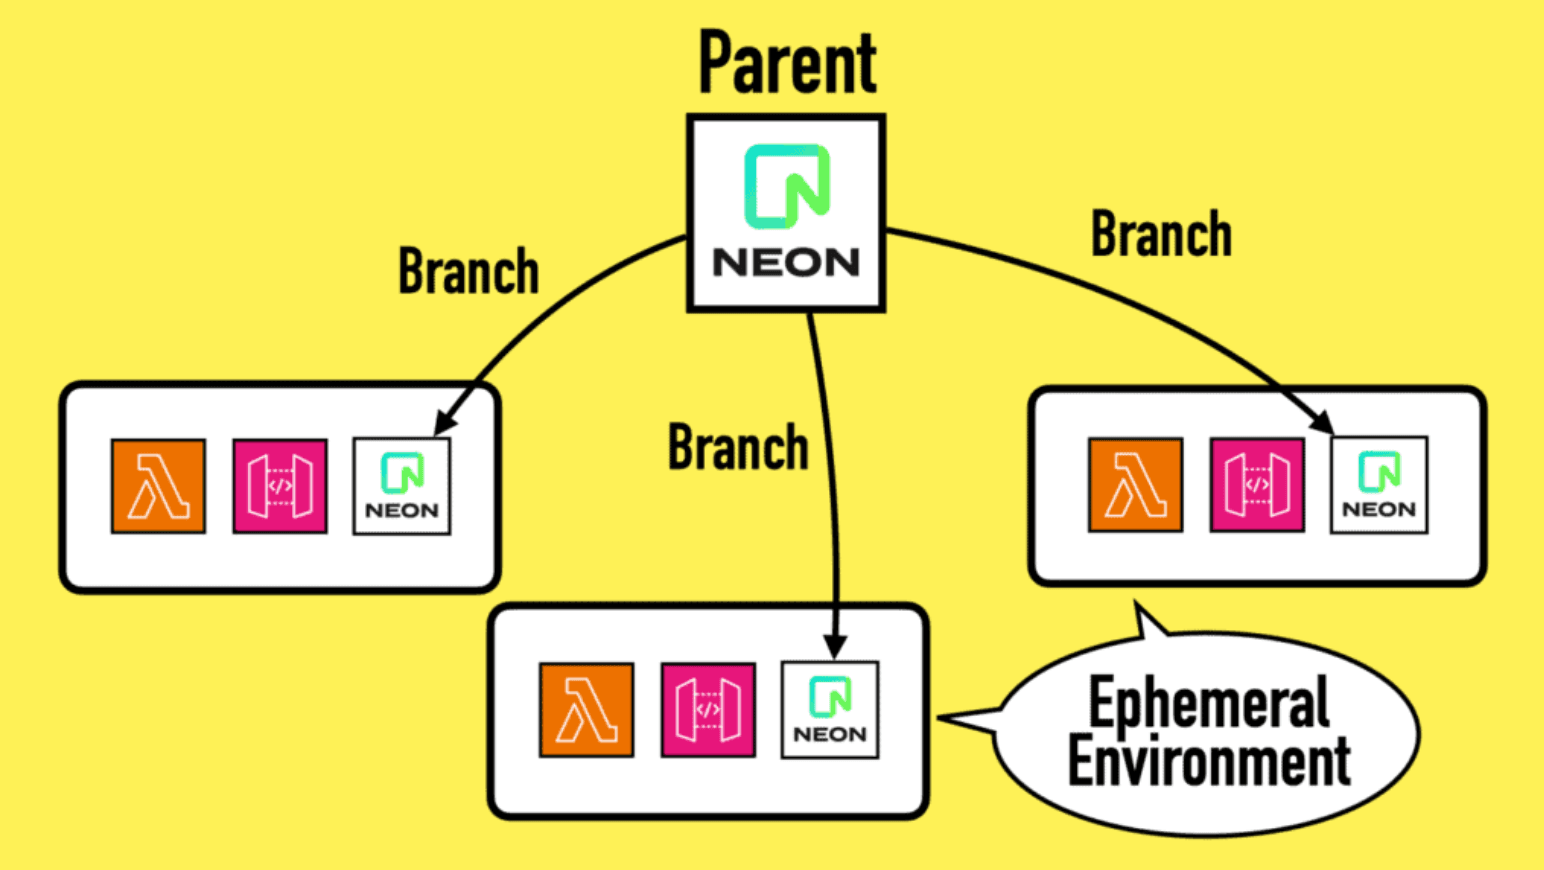
Data Branching
Because Neon separates storage from compute, you can easily create a copy of an existing database by branching from it. Think Git branching but for your data!
This works great with ephemeral environments.
Want to run some tests without polluting your database? Create a branch for the tests and delete it afterwards.
Want to let multiple developers work on the same codebase simultaneously? Create a branch for each so they don’t step on each other’s toes.
Every ephemeral environment can have its own branch of your development database.
If you need to seed the database first, then seed the data in the development database and every branch will inherit the seed data.
Importantly, branching a Neon database is instant! Which is important for automation and developer productivity.
By default, branching a database copies both the data and schema. But Neon also supports schema-only branching as well, in case you don’t want any seed data and want to start from a clean slate.
Using Neon with Ephemeral Environments
Let’s use a simple TODO API to demonstrate how to use Neon and how to use it with ephemeral environments. You can find all the relevant source code here.
Create the todos database
First, sign up for an account with Neon at neon.tech and create a new project. Let’s call the database “todos”.
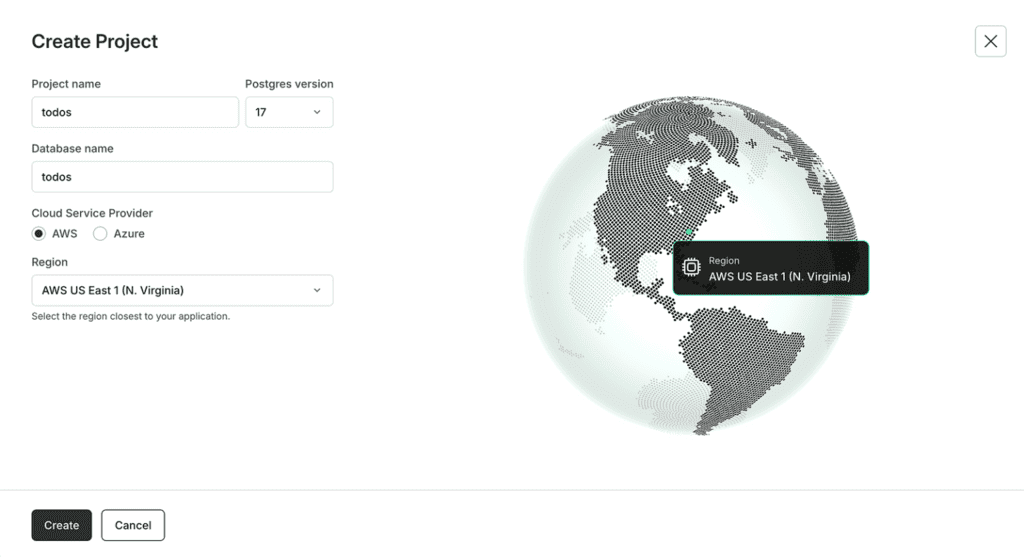
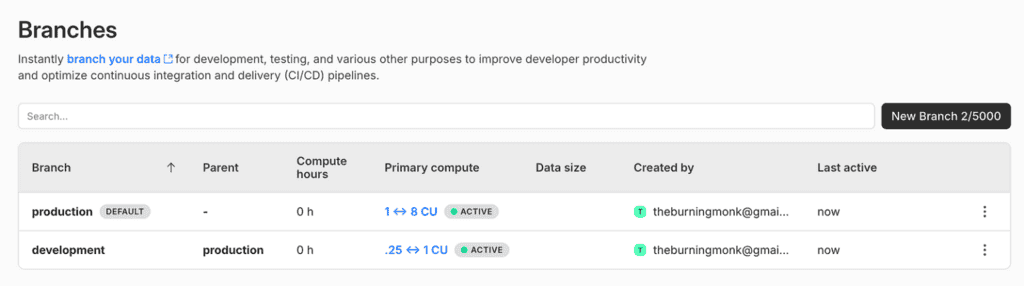
By default, this creates a production and development branch of the new todos database. Notice that the development branch has less compute power and is not intended for production use or load testing.
Seeding the todos database
In the demo code, there is a SQL script for creating a “todos” table.
CREATE TABLE IF NOT EXISTS todos (
  id UUID PRIMARY KEY,
  title VARCHAR(255) NOT NULL,
  description TEXT,
  completed BOOLEAN DEFAULT FALSE,
  created_at TIMESTAMP WITH TIME ZONE DEFAULT CURRENT_TIMESTAMP
);
You can run this script directly in the Neon console.
Go to the “SQL Editor”, select the development branch, and click Run to execute the script.
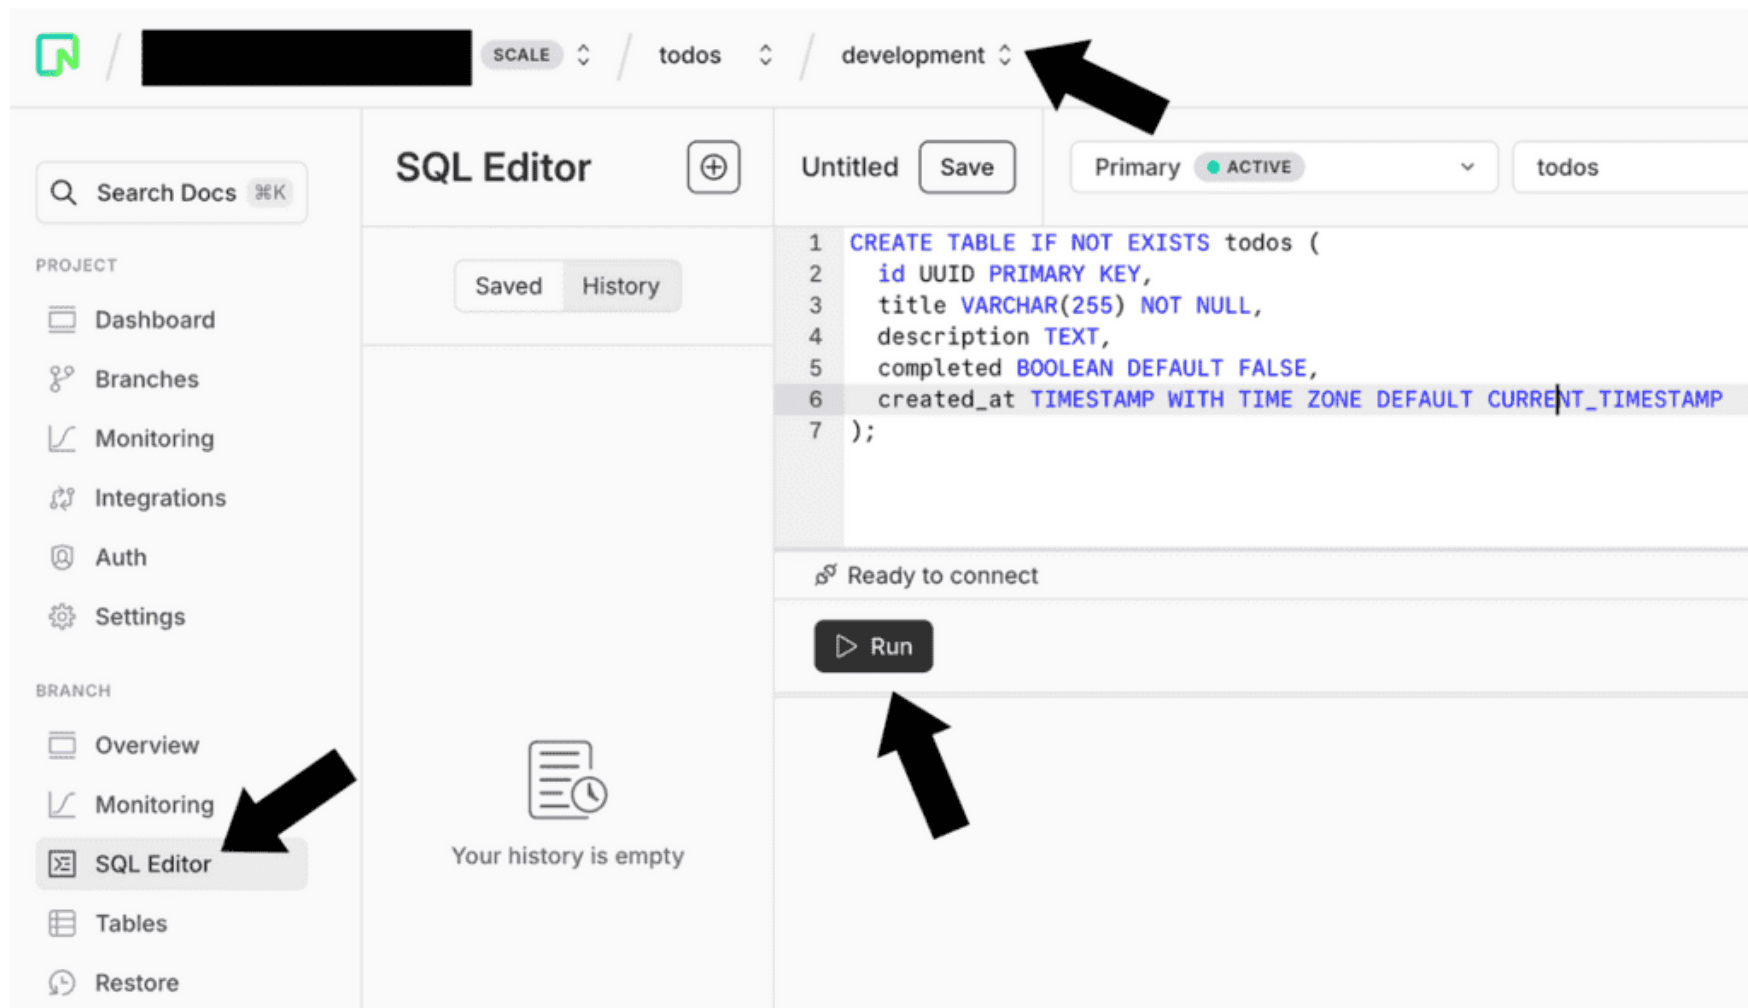
You can also save frequently used scripts.
Now that you have created a new todos table, you can also look at the data directly in the Neon console.
Go to “Tables” and select the development branch.
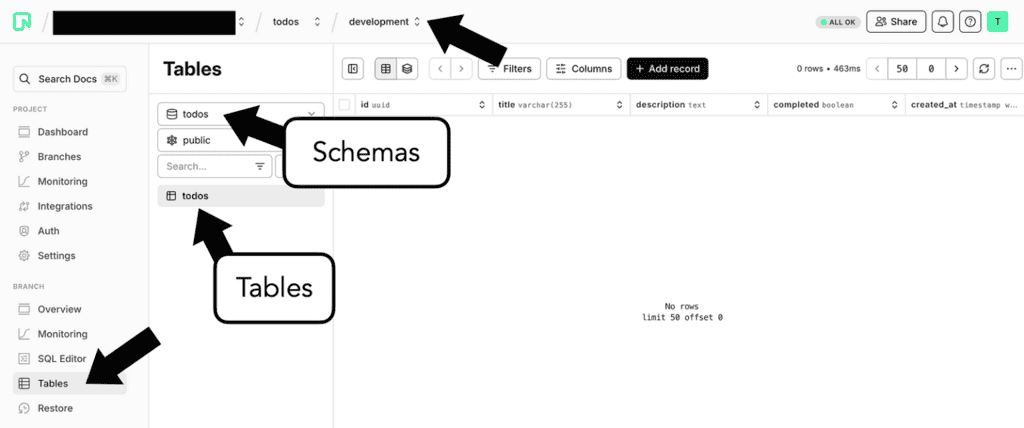
Currently, there is no data. However, you can use the “Add record” button to add a row directly in the console.

There is a lot more you can do in the Neon console. For example,
- See the schema differences between this branch and its parent (think
git diff). - Reset a branch and update it to the latest schema and data from its parent (think
git reset). - Create read replicas.
Connecting to the todos database
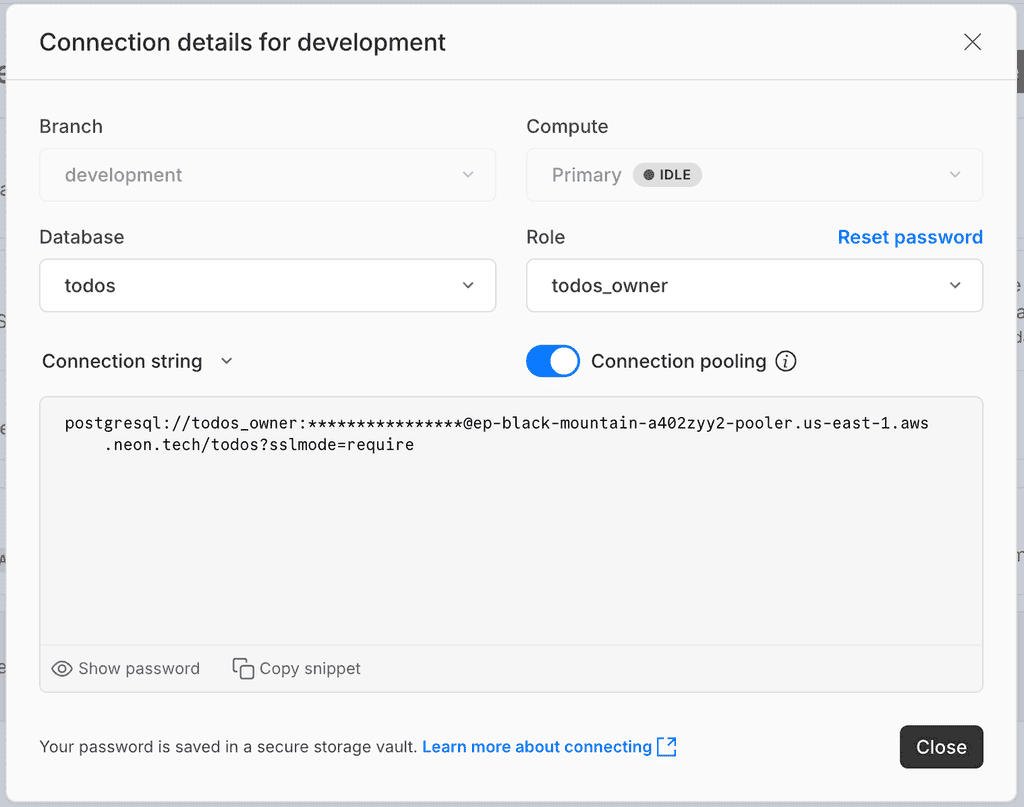
To connect to the database, select the branch you want, and click Connect.
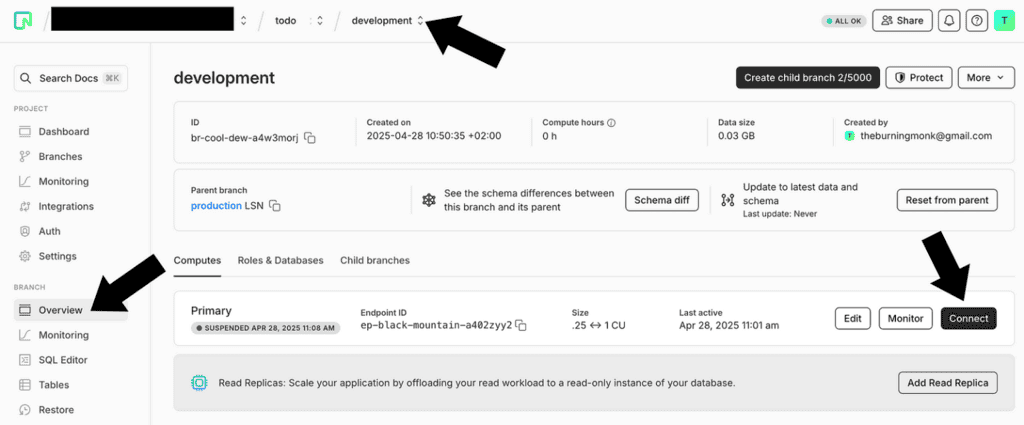
Copy the connection string from the pop-up.
The TODO API architecture
This is the high-level architecture of the TODO API, where a different Lambda function handles each CRUD operation.
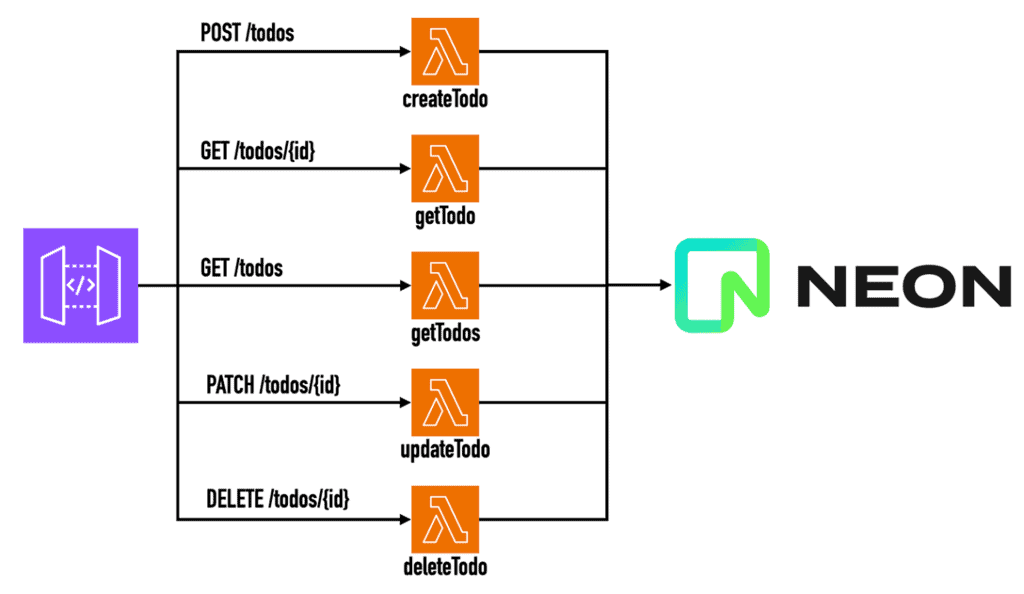
Everything is configured with the Serverless Framework and deployed as a single unit.
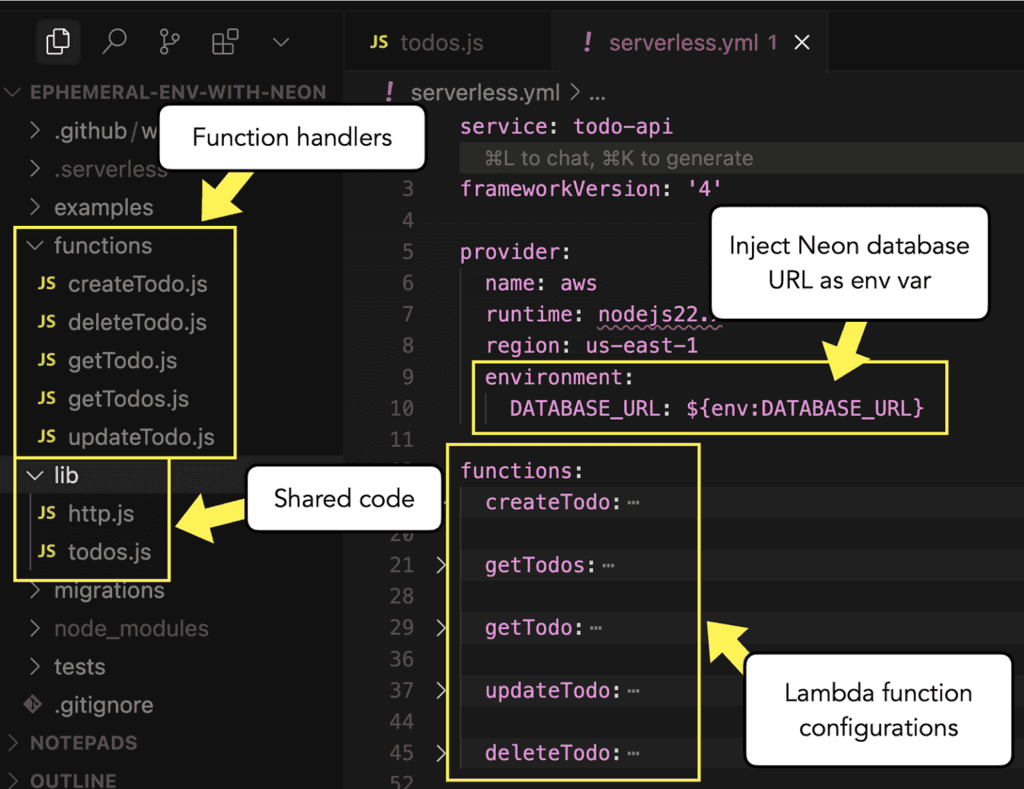
As shown below, each function has its own handler module. Shared code between the functions is kept in the same project folder.
The API path for each function is configured as follows.
createTodo:
  handler: functions/createTodo.handler
  events:
    - http:
        path: /todos
        method: post
        cors: true
During deployment, the Serverless Framework will look for an environment variable called DATABASE_URL and use it to populate an environment variable of the same name for each Lambda function.
environment:
  DATABASE_URL: ${env:DATABASE_URL}
This way, our code can use the DATABASE_URL environment variable to initialise the Neon serverless driver at runtime, like this.
import { neon } from '@neondatabase/serverless';

const sql = neon(process.env.DATABASE_URL);
Understanding the Neon serverless driver
Take a look at the lib/todos.js module.
Notice that we’re using the sql template tag to execute queries (against Neon’s data API) written as a string literal, like this:
import { neon } from '@neondatabase/serverless';
import { v4 as uuidv4 } from 'uuid';

const sql = neon(process.env.DATABASE_URL);

export const createTodo = async (title, description) => {
  const id = uuidv4();
  const result = await sql`INSERT INTO todos (id, title, description, completed, created_at)
      VALUES (${id}, ${title}, ${description}, ${false}, ${new Date().toISOString()})
      RETURNING *`;

  return result[0];
};
Your immediate reaction might be “This is vulnerable to SQL injection attacks!”. But rest assured, the sqltemplate tag is inherently safe from SQL injection attacks.
It’s written as a JavaScript tag function, which receives the string literal and its values as separate parameters. Internally, the sql template tag converts these into a SQL template with separate parameters.
It’s a really nice feature and helps keep your code clean and safe at the same time. If you want to learn more about how this works, then read this article for more details.
One thing to note, however, is that this only works if you use the sql template tag with a string literal directly! The following will not work because the sql tag function is called with a string, not a string literal.
export const execute = async (query) => {
  return await sql query;
};

export const createTodo = async (title, description) => {
  const id = uuidv4();
  const result = await execute(`INSERT INTO todos (id, title, description, completed, created_at)
      VALUES (${id}, ${title}, ${description}, ${false}, ${new Date().toISOString()})
      RETURNING *`);

  return result[0];
};
Handling dynamic queries
Ok, but what if you need to construct the query dynamically?
For example, in the updateTodo function, we only want to update a field if the caller provides a new value. We would need to construct the SQL query dynamically based on the user’s request.
The Neon serverless driver also has a query function for these cases.
It takes a query string with embedded $1, $2 (etc.) placeholders, followed by an array of query parameters. So you can build up the SQL query string dynamically, like this:
export const updateTodo = async (id, title, description, completed) => {
  const updates = [];
  const values = [];
  let paramCount = 1;

  if (title !== undefined) {
    updates.push(`title = $${paramCount}`);
    values.push(title);
    paramCount++;
  }

  if (description !== undefined) {
    updates.push(`description = $${paramCount}`);
    values.push(description);
    paramCount++;
  }

  if (completed !== undefined) {
    updates.push(`completed = $${paramCount}`);
    values.push(completed);
    paramCount++;
  }

  values.push(id);

  const result = await sql.query(`UPDATE todos
    SET ${updates.join(', ')}
    WHERE id = $${paramCount}
    RETURNING *`, values);

  if (result.length === 0) {
    return null;
  }

  return result[0];
};
Ok, so that’s the code, what about the ephemeral environments?
Creating & deleting ephemeral environments
You can create a new branch of your database every time you create an ephemeral environment for your application.
You can use the Neon console to create and delete branches. But we want to automate this process to eliminate manual steps.
Fortunately, you can use the Neon API SDK to accomplish this. The demo repo contains examples of this – have a look in the scripts folder.
Your workflow might look like this:
- Branch your source code to start work on a new feature called
tbm-042. - Run
node scripts/create-branch development tbm-042to create a new branch calledtbm-042. The script outputs the connection URL for the new branch. Capture this in an environment variable calledDATABASE_URL. This is the environment variable that the Serverless Framework will look for in the next step. - Run
npx serverless deploy -s tbm-042to create a new ephemeral environment (also calledtbm-042) for your application. - Iterate on the code and run tests against the database branch. You can find some example tests in the
testsfolder of the demo code. - Create a PR with your changes.
- Run
npx serverless remove -s tbm-042to delete the ephemeral environment. - Run
node scripts/delete-branch.cjs tbm-042to delete thetbm-042branch in Neon.
Using ephemeral environments in CI/CD pipelines
Another common use case for ephemeral environments is in CI/CD pipelines. This ensures that tests are run against a clean, well-defined initial system state and avoids polluting shared environments with test data.
Neon also offers several GitHub Actions to help you automate the creation and deletion of branches.
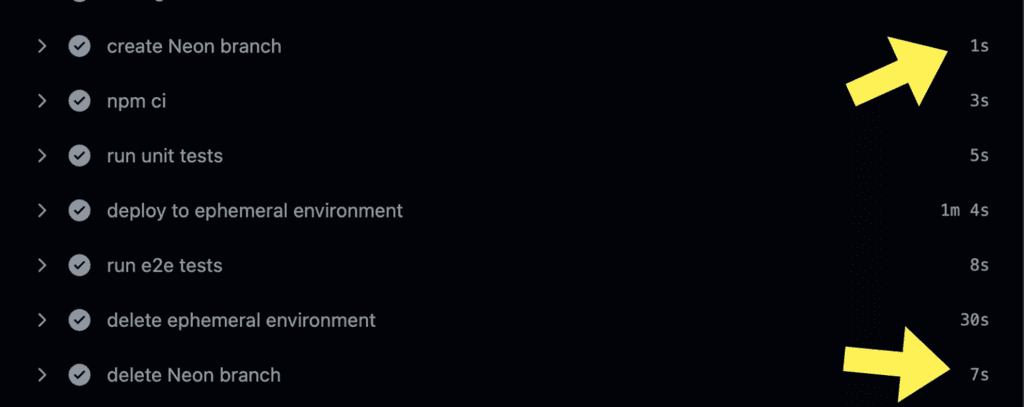
In the demo app, you can see an example workflow that:
- Create a branch off the latest in the
developmentbranch. - Runs unit tests against the newly created database branch.
- Create an ephemeral environment for the TODO API and point it to the new database branch. The serverless-export-outputs plugin captures the
ServiceEndpointstack output in a.envfile. - Runs end-to-end tests against the ephemeral environment. These tests use the
.envfile to find out where the deployed API is. - Deletes both the ephemeral environment and the database branch.
- Deploy the application changes to the dev environment.
Again, creating and deleting database branches is instant (see below). It helps to keep the pipeline feeling fast and snappy despite doing quite a lot of things!
Here are the relevant steps for reference.
- name: create Neon branch
  id: create-branch
  uses: neondatabase/create-branch-action@v6
  with:
    project_id: ${{ secrets.NEON_PROJECT_ID }}
    api_key: ${{ secrets.NEON_API_KEY }}
    # name of the parent branch
    parent_branch: development
    # name of the new branch
    branch_name: gh-${{ github.sha }}
    database: todos
    role: todos_owner

- name: npm ci
  run: npm ci

- name: run unit tests
  run: npm run test:unit
  env:
    DATABASE_URL: ${{ steps.create-branch.outputs.db_url }}

- name: deploy to ephemeral environment
  id: deploy-sls
  run: npx serverless deploy --stage dev-gh-actions
  env:
    DATABASE_URL: ${{ steps.create-branch.outputs.db_url }}
    SERVERLESS_ACCESS_KEY: ${{ secrets.SERVERLESS_ACCESS_KEY }}

- name: run e2e tests
  run: npm run test:e2e
  env:
    DATABASE_URL: ${{ steps.create-branch.outputs.db_url }}

- name: delete ephemeral environment
  if: ${{ always() && steps.deploy-sls.outcome == 'success' }}
  run: npx serverless remove --stage dev-gh-actions
  env:
    DATABASE_URL: ${{ steps.create-branch.outputs.db_url }}
    SERVERLESS_ACCESS_KEY: ${{ secrets.SERVERLESS_ACCESS_KEY }}

- name: delete Neon branch
  if: ${{ always() && steps.create-branch.outcome == 'success' }}
  uses: neondatabase/delete-branch-action@v3
  with:
    project_id: ${{ secrets.NEON_PROJECT_ID }}
    api_key: ${{ secrets.NEON_API_KEY }}
    # name of the new branch
    branch: gh-${{ github.sha }}

- name: deploy to dev
  run: npx serverless deploy
  env:
    DATABASE_URL: ${{ secrets.DEV_DATABASE_URL }}
    SERVERLESS_ACCESS_KEY: ${{ secrets.SERVERLESS_ACCESS_KEY }}
Summary
In this article, we discussed:
- Why you should use ephemeral environments.
- Why Neon is a good fit for ephemeral environments.
- How Neon works and how to use the Neon console to manage branches and query your data.
- How to use the Neon serverless driver to query your data.
- How to automate the process of creating and deleting branches, and how to incorporate them into a productive development workflow.
- How to use Neon with ephemeral environments in CI/CD pipelines.
With Neon and ephemeral environments, standing up a fresh copy of your database is simple, fast and cost-efficient. Make your changes, run your tests, validate your feature, then tear it down. You’ll end up spending less time on infrastructure and more time on building.
Neon has a Free Plan. Sign up without a credit card and start building.